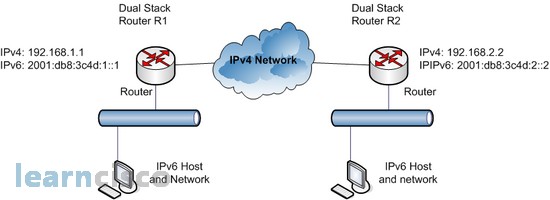
We will discuss on this page about the migration techniques from IPv4 to IPv6, because soon or later you will need to change your network and you must be prepared when the time has come. The first technique is called dual stacking, which allows a device to have both the IPv4 and IPv6 protocol stack running so it’s capable of continuing on with its existing communications and simultaneously run newer IPv6 communications as they’re implemented. The next strategy is the 6to4 tunneling approach; this is your choice if you have an all IPv6 network that must communicate over an IPv4 network to reach another IPv6 network.
Dual Stacking
This is the most common type of migration strategy because, it’s the easiest on us-it allows our devices to communicate using either IPv4 or IPv6. Dual stacking lets you upgrade your devices and applications on the network one at a time. As more and more hosts and devices on the network are upgraded, more of your communication will happen over IPv6, and after you’ve arrived-everything’s running on IPv6, and you get to remove all the old IPv4 protocol stacks you no longer need. Configuring dual stacking on a Cisco router is amazingly easy-all you have to do is enable IPv6 forwarding and apply an address to the interfaces already configured with IPv4. It’ll look something like this:
Router(config)#

Router(config)#ipv6 unicast-routing

Router(config)#

Router(config)#int fa 0/0

Router(config-if)#

Router(config-if)#ipv6 address 2001:DB8:3C4D:15::/64 eui-64

Router(config-if)#ip address 192.168.1.1 255.255.255.0

Router(config-if)#

Router(config-if)#end

Router#
6to4 Tunneling
6to4 tunneling is really useful for carrying IPv6 data over a network that’s still IPv4. It’s quite possible that you’ll have IPv6 subnets or other portions of your network that are all IPv6, and those networks will have to communicate with each other. Not so complicated, but when you consider that you might find this happening over a WAN or some other network that you don’t control, that could be a bit ugly. So we will create a tunnel that will carry the IPv6 traffic for us across the IPv4 network. The whole idea of tunneling isn’t a difficult concept, and creating tunnels really isn’t as hard as you might think. All it really comes down to is snatching the IPv6 packet that’s happily traveling across the network and sticking an IPv4 header onto the front of it.
To get a picture of this, take a look at the following, we’ll configure the tunnel on each router:

R1(config)#

R1(config)#int tun 0

R1(config-if)#ipv6 addr 2001:db8:3c4d:1::1/64

R1(config-if)#

R1(config-if)#tunnel source 192.168.1.1

R1(config-if)#tunnel destination 192.168.2.2

R1(config-if)#tunnel mode ipv6ip

R1(config-if)#
R2(config)#

R2(config)#int tun 0

R2(config-if)#ipv6 addr 2001:db8:3c4d:2::2/64

R2(config-if)#

R2(config-if)#tunnel source 192.168.2.2

R2(config-if)#tunnel destination 192.168.1.1

R2(config-if)#tunnel mode ipv6ip

R2(config-if)#
Our Recommended Premium CCNA Training Resources
These are the best CCNA training resources online:
Click Here to get the Cisco CCNA Gold Bootcamp, the most comprehensive and highest rated CCNA course online with a 4.8 star rating from over 30,000 public reviews. I recommend this as your primary study source to learn all the topics on the exam.

Want to take your practice tests to the next level? AlphaPreps purpose-built Cisco test engine has the largest question bank, adaptive questions, and advanced reporting which tells you exactly when you are ready to pass the real exam. Click here for your free trial.
