
The Disaster Recovery System (DRS), which can be invoked from Cisco Unified Communications Manager Administration, provides full data backup and restore capabilities for all servers in a Cisco Unified Communications Manager cluster. The Disaster Recovery System allows you to perform regularly scheduled automatic or user-invoked data backups.
The Disaster Recovery System performs a cluster-level backup, which means that it collects backups for all servers in a Cisco Unified Communications Manager cluster to a central location and archives the backup data to physical storage device.
DRS restores its own settings (backup device settings and schedule settings) as part of the platform backup/restore. DRS backs up and restores drfDevice.xml and drfSchedule.xml files. When the server is restored with these files, you do not need to reconfigure DRS backup device and schedule.
The DRS is taking care for the following components:
Cisco Unified Communications Manager database (CCMDB), includes Cisco Unified Communications Manager, Call Detail Records Analysis and Reporting, and Call Detail Records
- Platform
- Music On Hold (MOH) Audio Files
- BAT Bulk Provisioning Service (BPS)
- CCM Preference Files (CCMPREFS)
- TFTP Phone device files (TFTP)
- SNMP Syslog Component (SYSLOGAGT SNMP)
- SNMP CDP Subagent (CDPAGT SNMP)
- Trace Collection Tool (TCT)
- Cluster Manager (CLM)
- Cisco Extended Functions (CEF)
- Reporter
In addition, the Disaster Recovery System backs up and restores the following components of the IM and Presence Service if you have IM and Presence nodes installed in the cluster:
- Trace Collection Tool (TCT)
- IM and Presence Preference Files (PREFS)
- IM and Presence Database (DB)
- XMPP Configuration Files (XCP)
- Syslog Component (SYSLOGAGT)
- Platform
- Cluster Manager (CLM)
- IM and Presence Configuration Files (CUP)
Before starting with the activities you must have access to an SFTP server which will be used to configure a network storage location. The SFTP path must exist before you create the backup. The account that is used to access the SFTP server must have write permission for the selected path. The SFTP protocol is SSH file transfer protocol and this is the only option that is supported as a destination device in DRS. There are third party applications which can provide you this feature but probably the easiest way is to bring up a Linux box and to enable SSH on it.
Task 1: Back up Cisco Unified Communications Manager
In this lab you will configure back ups on Cisco Unified Communications Manager and manually will back it up to a network share.
Activity Procedure
Complete these steps:
- Login to the CUCM with your credentials.
- Start your Linux box.
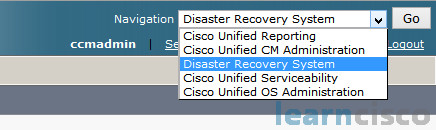
- From Communications Manager Administration page, go to Navigation> Disaster Recovery System page and click the Go button. You will need to login again as the disaster recovery site is separate from the administration site.
- From the menu, select Backup > Backup Device.
- Click Add New.
- Type in a name Share in the Backup Device Name field
- Type in the IP address 10.1.1.90 into the Host name/IPAddress field.
- Type into the Path Name field “/home/admin/”.
- Type in the username (admin) and the password used in the Linux box. (By default direct login with root user is disabled in the SSH configuration file.)
- Click Save and the system will test the connection to the SFTP server. If everything is fine there should be a message on the top “Update successful“.
- From the menu, select Backup > Scheduler.
- Click Add New.
- Type in a name Weekly in the Schedule Name field.
- Select the backup device that was created in the previous steps.
- Select UCM as the feature to backup.
- Configure the scheduler to back up the system every Sunday at 3.00 am beginning tomorrow.
- Click the Save button and then the Ok button on the warning screen.
- Click Enable Schedule at the bottom of the screen.
- Click Save button and then the Ok button on the warning screen.
- From the menu, select Backup > Manual Backup.
- Select the Backup Device created in the previous steps.
- Select UCM as the feature to back up.
- Click Start backup button and then click the Ok button on the warning screen.
- The manual backup process will take some time to finish.
- To check the status of backup process, from the menu select Backup > Current Status. The web page will display the backup status and it will refresh automatically or the refresh button can also be used.
- After the backup process is done, access the Linux box and list the content of the /home/admin folder. This is where all the backup files are stored.
- Go back to the administration page by using the navigation pane. You will need to login again.
- On the Cisco Unified Communications Manager administration page, select Call Routing > Translation Pattern, in order to change your Communications Manager configuration.
- Click Аdd New button.
- On the Translation Pattern page, use the following parameters
– Translation pattern : 234XXXX
– Provide Outside Dial tone : unchecked
– Called Party Transformation mask : 3XXX - Click Save
- You can add more translation pattern using different patterns.
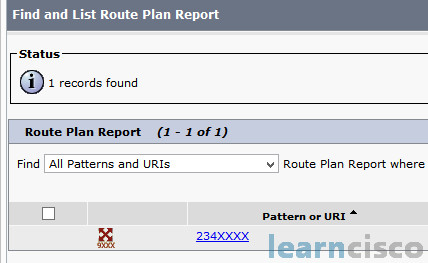
- To verify that the translation pattern has been inserted, from the menu select Call Routing > Route Plan Report.
- On the Route Plan Report page, click Find button.
- The translation patterns configured should be listed on this page.
Activity Verification
You have completed this task when you attain these results:
- The backup history contains the actual manual backup with the result “success”.
- Translation pattern is added correctly.
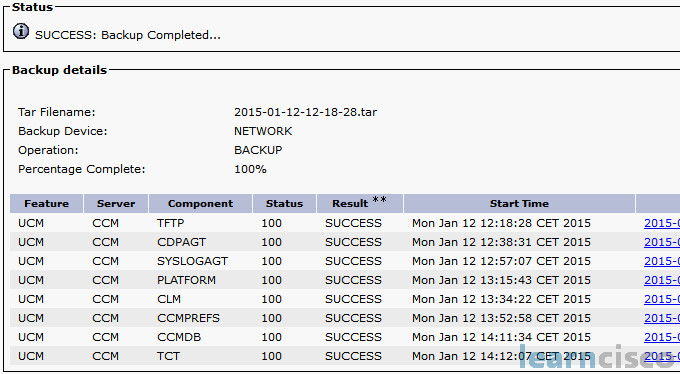
[root@centos ~]# ls -lh /home/admin/total 772M-rw-rw-r– 1 admin admin 26M Jan 12 14:12 2015-01-12-12-18-28_CCM_UCM_CCMDB.tar-rw-rw-r– 1 admin admin 13M Jan 12 13:53 2015-01-12-12-18-28_CCM_UCM_CCMPREFS.tar-rw-rw-r– 1 admin admin 21K Jan 12 12:38 2015-01-12-12-18-28_CCM_UCM_CDPAGT.tar-rw-rw-r– 1 admin admin 11K Jan 12 13:34 2015-01-12-12-18-28_CCM_UCM_CLM.tar-rw-rw-r– 1 admin admin 871K Jan 12 13:16 2015-01-12-12-18-28_CCM_UCM_PLATFORM.tar-rw-rw-r– 1 admin admin 11K Jan 12 12:57 2015-01-12-12-18-28_CCM_UCM_SYSLOGAGT.tar-rw-rw-r– 1 admin admin 11K Jan 12 14:12 2015-01-12-12-18-28_CCM_UCM_TCT.tar-rw-rw-r– 1 admin admin 733M Jan 12 12:20 2015-01-12-12-18-28_CCM_UCM_TFTP.tar-rw-rw-r– 1 admin admin 13K Jan 12 14:31 2015-01-12-12-18-28_CCM_drfComponent.xml
Task 2: Restore Cisco Unified Communications Manager
In this task we will restore Cisco Unified Communications Manager from the previously created system backup.
Activity Procedure
Complete these steps:
- From Communications Manager Administration page, go to Navigation> Disaster Recovery System page. You will need to login again. From the menu, select Restore > Restore Wizard.
- Select the Device Name.
- Click Next button.
- For Step 2 of the Restore page, select the backup file (there should be one backup file from the previous task; if there is no backup file, repeat task 1).
- Click Next button.
- For Step 3 of the Restore page, on Select Features select UCM, and click Next.
- For Step 4 Restore page, on Select the servers to be restored for each feature, select CCM, and click Restore.
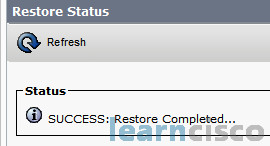
- Wait until restore process is finished.
- A reboot of the server is needed which can be accomplished in two ways. The server can be restarted through the Cisco Unified OS Administration web interface or the command line via SSH.
- To restart the server through web interface, use the navigation pane and access the Cisco Unified OS Administration web page. You will need to login using your credentials.
- From the menu, select Settings >Version.
- Click Restart and the Ok.
- To restart the server through CLI, use the SSH client (PuTTy) and initiate SSH session to the Cisco Unified Communications Manager Server. Login using your credentials.
- Type this command: utils system restart.
- Type yes to continue.
- Read the warning message and wait until message for shutdown displayed.
- Wait until the Communications Manager server is up and running (Try to ping 10.1.1.10 to see when the server will be reachable. The server will take 10 to 15 minutes to come back online where the web pages are accessible).
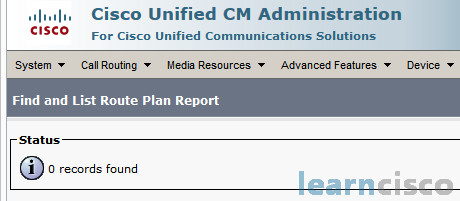
- Log back into the Cisco Unified Communications Manager administration page, and select Call Routing > Route plan Report and click Find to list all dial plan patterns.
- The translation pattern(s) created on the previous task will not be there anymore.
Activity Verification
You have completed this task when you attain these results:
- Verify that the changes done in step one are gone and the previous configuration has been restored.
Our Recommended Premium CCNA Training Resources
These are the best CCNA training resources online:
Click Here to get the Cisco CCNA Gold Bootcamp, the most comprehensive and highest rated CCNA course online with a 4.8 star rating from over 30,000 public reviews. I recommend this as your primary study source to learn all the topics on the exam.

Want to take your practice tests to the next level? AlphaPreps purpose-built Cisco test engine has the largest question bank, adaptive questions, and advanced reporting which tells you exactly when you are ready to pass the real exam. Click here for your free trial.
