
The dial plan is one of the most important components of a Unified Communications system. It is an integral part of all call processing agents. Generally, the dial plan is the decision maker and instructs the call processing agent on how to route the calls. We can describe the dial plan with the following main functions:
- Endpoint addressing
All endpoints (such as IP phones, analogue phones, fax machines) and applications (such as voice-mail systems, auto attendants, and conferencing systems – all these through CTI ports) have their own directory numbers.
- Path selection
To reach the same destination different paths can be selected – depending on the calling device. A typical example for this is when the primary path between two branches through the WAN is not available due to failure. In this case there can be configured a backup route where the call will be routed through the public PSTN network.
- Calling privileges
By granting or denying access to certain destinations we can assign different classes of service to the different groups of devices. For example, as we mentioned in the last topic the automatically configured phones should be restricted to only emergency calls. Then we can have different types of employees who have different access levels. Some of them can initiate only internal calls, other will have local calls and then are the unrestricted users who will be able to initiate even international calls.
- Digit manipulation
When we are initiating a call to the PSTN network we have to convert our internal numbers to match the public numbering plan. Our provider (Telco) is giving us a range of numbers that we can utilize and if we are initiating a calls from our own network, we have to present ourselves with these numbers. Otherwise the calls most probably will be rejected from the provider. In these cases it is necessary to manipulate the dialing string before routing the call. But as you know in most of the cases we are using prefix to get access to the outgoing line. In this scenario we need to modify the dialed number in a way to remove the prefix.
- Call coverage
We can group the endpoints or the outgoing links in special groups. These groups can handle the incoming calls for a certain service by following different rules – top-down, circular, longest idle or broadcast. The digit analysis function decides which calls should be allowed to a user, to an endpoint (IP Phone), to a gateway, or to a trunk. This function is the step where the call privileges are implemented. The following fundamental constructs are used to implement digit analysis:
- Patterns – they are numerical representations of telephone numbers which, when matched, trigger call routing. The patterns can be with exact match in case of directory numbers but can be also masked numbers in case of route patterns. If there are more than 1 match in the dial plan for a certain destination, the most exact match will be used.
- Partitions – they are used to separate patterns into logical groups. As a rule of the thumb to keep your dial plan under control everything which can be dialed (the patterns) should be assigned to a partition. This is why the good planing of the dial plan is very important.
- Calling search spaces – read it once again. The name is almost self explanatory. The calling search spaces allow control over what groups of patterns can be accessed from particular device. In other words – what numbers can be dialed. Or another example – what gateways or trunks should be used from a user to establish a call. For instance, all voice gateways in your branches are using the same prefix to access them – 0 or 9 in most of the cases. However, every phone in each branch is using its local gateway to reach the PSTN.
The path selection for a call is controlled by a call routing function. This function is where IP trunks or voice gateways with T1 or E1, or ISDN interfaces are chosen to carry a particular call. The call routing function also is taking care for the automated failover when the primary path is not accessible, no matter if it is a problem with the media or because of not enough resources (bandwidth).
Task 1: Configure Intra Site Routing
In this task we will configure intrasite routing for San Jose and Chicago.
Dial Plan Design for Intra-Site Routing
The tables that follow show the dial plan design for intra-site routing.
Partitions: Intra-Site Routing
| Partition | Description |
|---|---|
| SJC-Phones | Contains all San Jose phones. |
| CHI-Phones | Contains all Chicago phones. |
CSS: Intra-Site Routing
| CSS | Partition | Description |
|---|---|---|
| SJC-Everywhere-CSS | SJC-Phones | Contains all San Jose phones. |
| CHI-Everywhere-CSS | CHI-Phones | Contains all Chicago phones. |
Route Plan: Intra-Site Routing Summary
| Pattern | Partition | Type | Destination | Digit Manipulation | Description |
|---|---|---|---|---|---|
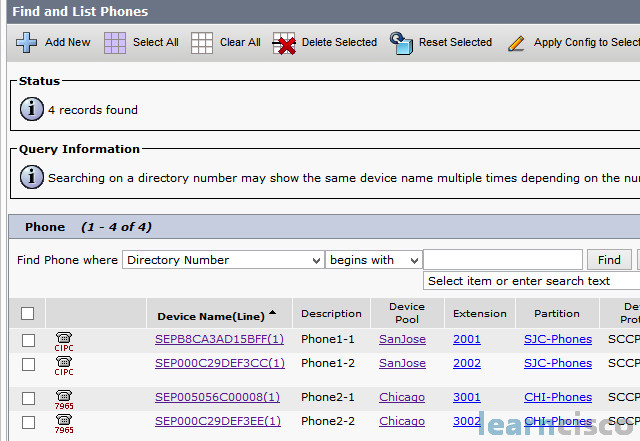
| 2001 | SJC-Phones | DN | SJC-Everywhere-CSS | NA | Phone1-1 |
| 2002 | SJC-Phones | DN | SJC-Everywhere-CSS | NA | Phone1-2 |
| 3001 | CHI-Phones | DN | CHI-Everywhere-CSS | NA | Phone2-1 |
| 3002 | CHI-Phones | DN | CHI-Everywhere-CSS | NA | Phone2-2 |
Activity Procedure
Complete these steps:
- Login with your credentials in the CUCM Administration page. From the menu select Call Routing > Class of Control > Partitions.
- Click Add new button.
- Type in all the partition according to the first table above and click Save.
- Click Find to verify that the partitions have been added to the system.
- On Cisco Unified Communications Manager Administration page, from the menu select Call Routing > Class of Control > Calling Search Space.
- Click Add new button.
- For the Name field, type in the Calling Search space’s name, and select the partitions that will be assigned to this Calling search space. Both Calling Search Spaces will contain only the partition for its specific site.
- Click Save.
- Repeat steps 6 – 8 for all calling search spaces described in the table above.
- On Cisco Unified Communications Manager Administration page, from the menu select Device > Phone. Click Find to display all phones.
- Click Phone1-1 to modify it.
- Click on line 1.
- On the directory number configuration, assign the route partition according to the table.
- For the calling search space, assign the calling search space according to the table.
- Click Save.
- Click Reset the phone.
- Repeat steps 10 – 16 for all phones (use the configuration table as a reference)
Activity Verification
You have completed this task when you attain these results:
- SanJose phones (Phone1-1 and Phone1-2) can only call each other. Any attempt to call non SanJose phone will fail.
- Chicago phones (Phone2-1 and Phone2-2) can only call each other. Any attempt to call non Chicago phone will fail.
Task 2: Configure On-Cluster Intersite Routing
In this task you will configure on-cluster intersite routing between San Jose and Chicago.
Dial Plan Design for Intersite Routing
The tables that follow show the dial plan design for intersite routing.
Partitions: Intersite Routing
| Partition | Description |
|---|---|
| IntersiteRouting | Used for intersite routing. |
CSS: Intersite Routing
| Calling Search Space | Partition | Description |
|---|---|---|
| SJC-Everywhere-CSS | SJC-Phones IntersiteRouting |
Contains all San Jose phones. |
| CHI-Everywhere-CSS | CHI-Phones IntersiteRouting |
Contains all Chicago phones. |
Route Plan: Intersite Routing Summary
| Pattern | Partition | Type | Destination | Digit Manip. | Description |
|---|---|---|---|---|---|
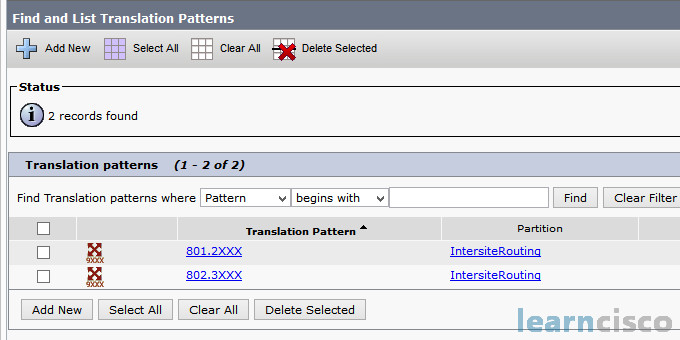
| 802.3XXX | IntersiteRouting | TP | CHI-Everywhere-CSS | PreDot | Routes calls to Chicago |
| 801.2XXX | IntersiteRouting | TP | SJC-Everywhere-CSS | PreDot | Routes calls to San Jose |
Activity Procedure
Complete these steps:
- Add the IntersiteRouting partition.
- Add partition IntersiteRouting to Calling search space SJC-Everywhere-CSS and CHI-Everywhere-CSS. To achieve this do the following steps:
– On Cisco Unified Communications Manager administration page, from the menu select Call Routing > Class of Control > Calling Search Space
– click Find - Click on calling search space CHI-Everywhere-CSS.
- On Calling Search Space configuration page, highlight partition IntersiteRouting, and click the down arrow (the one on the middle) and click Save.
- Repeat step 3 – 5 for calling search space SJC-Everywhere-CSS.
- In the next steps translation pattern will be added.
- On Cisco Unified Communications Manager administration page, from the menu select Call Routing > Translation Pattern.
- Click Add New.
- Use the following parameters for the new translation pattern:
– Translation pattern : 802.3XXX
– Partition : IntersiteRouting
– Calling Search Space : CHI-Everywhere-CSS
– Use Calling party’s External Phone number mask : Checked
– Discard Digits: PreDot - Click Save.
- Repeat step 8 – 10 with the following parameters for the new translation pattern:
– Translation pattern : 801.2XXX
– Partition : IntersiteRouting
– Calling Search Space : SJC-Everywhere-CSS
– Use Calling party’s External Phone number mask : Checked
– Discard Digits: PreDot
Activity Verification
You have completed this task when you attain these results:
- Now IP Phones in SanJose (Phone1-1 and Phone1-2) and in Chicago (Phone2-1 and Phone2-2) can call each other. But to call Each other a site code must be used. In this case site code for SanJose is 801, and site code for Chicago is 802.
Task 3: Configure Intrasite PSTN Routing
In this task you will configure intrasite and PSTN routing for San Jose and Chicago.
Dial Plan Design for PSTN Routing
The tables that follow show the dial plan design for intra-site routing.
Partitions: PSTN Routing
| Partition | Description |
|---|---|
| SJC-PSTN | San Jose access to the PSTN lines. |
| CHI-PSTN | Chicago access to the PSTN lines. |
CSS: PSTN Routing
| Calling Search Space | Partitions | Description |
|---|---|---|
| SJC-Local-CSS | SJC-Phones IntersiteRouting |
San Jose phones with local access only. |
| SJC-Everywhere-CSS | SJC-Phones IntersiteRouting SJC-PSTN |
San Jose phones with full access. |
| CHI-Local-CSS | CHI-Phones IntersiteRouting |
Chicago phones with local access only. |
| CHI-Everywhere-CSS | CHI-Phones IntersiteRouting CHI-PSTN |
Chicago phones with full access. |
Route Plan: PSTN Routing Summary
| Pattern | Partition | Type | Destination |
|---|---|---|---|
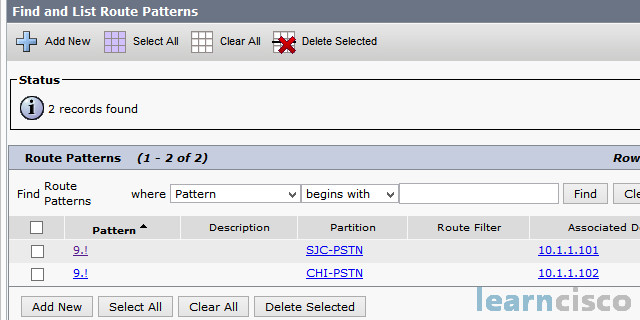
| 9.! | SJC-PSTN | RP | 10.1.1.101 |
| 9.! | CHI-PSTN | RP | 10.1.1.102 |
Activity Procedure
Complete these steps:
- Add new Partitions and calling search spaces according to the tables above.
- Modify the existing Everywhere calling seaerch spaces to contain the newly added partitions.
- On Cisco Unified Communications Manager administration page, from the menu select Call Routing > Route/Hunt > Route Pattern.
- Click Add New.
- Use the following parameters for the new route pattern:
– Route pattern: 9.!
– Partition: SJC-PSTN
– Gateway/Route-list: 10.1.1.101 - Click Save.
- Click Ok.
- Repeat steps 3 – 6 for all route patterns in the table.
- For Phone1-1, Phone1-2, Phone2-1 and Phone2-2, assign to their lines the proper calling search space. On Cisco Unified Communications Manager administration page, from the menu select Device > Phone. Click Find to display all phones.
- Click Phone1-1 to modify it.
- Click on line 1.
- For the calling search space, assign the Calling Search Space according to the bullet list below:
– Assign Calling Search space SJC-Everywhere-CSS to the line of Phone1-1
– Assign Calling Search space SJC-Local-CSS to the line of Phone1-2
– Assign Calling Search space CHI-Everywhere-CSS to the line of Phone2-1
– Assign Calling Search space CHI-Local-CSS to the line of Phone2-2 - Click Save.
- Click Reset the phone.
- Repeat steps 9 – 13 for all phones.
- Modify the gateways configuration. On the CUCM Administration page, from the menu select Device > Gateway and click Find.
- Click 10.1.1.101 to modiofy it.
- On Call Routing Information – Inbound Calls, configure SJC-Local-CSS as a Calling Search Space.
- Click Save and Apply Config.
- Repeat steps 16 – 19 for the second gateway 10.1.1.102 and configure CHI-Local-CSS as a Calling Search Space for the Inbound calls.
Activity Verification
You have completed this task when you attain these results:
- Now Phone1-1 and Phone2-1 can call eachother by using their public (DID) numbers, going through the PSTN network.
- Now Phone1-2 and Phone2-2 can only call through the Inter-site codes, but NOT through the public network.
Our Recommended Premium CCNA Training Resources
These are the best CCNA training resources online:
Click Here to get the Cisco CCNA Gold Bootcamp, the most comprehensive and highest rated CCNA course online with a 4.8 star rating from over 30,000 public reviews. I recommend this as your primary study source to learn all the topics on the exam.

Want to take your practice tests to the next level? AlphaPreps purpose-built Cisco test engine has the largest question bank, adaptive questions, and advanced reporting which tells you exactly when you are ready to pass the real exam. Click here for your free trial.
