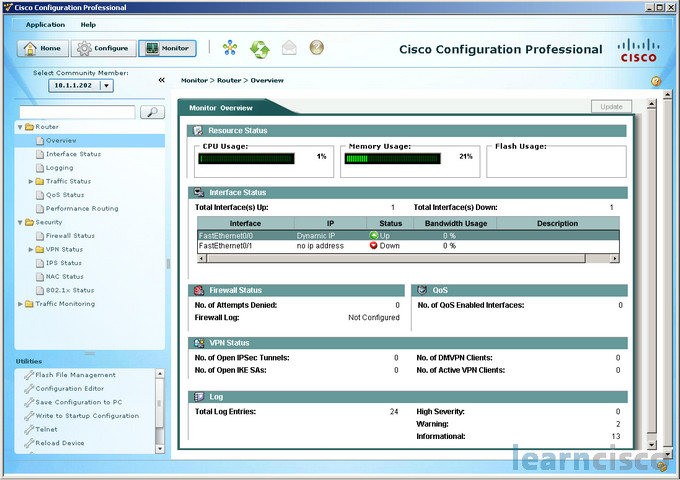
Cisco Configuration Professional is a graphical user interface management tool. We use this to access and manage our ISRs – Integrated Services Routers and ISR-G2 – the Generation 2 of the ISR. It’ll make routing, firewall, IPS, VPN, Unified Communications, WAN and LAN configurations a lot easier based on the GUI Wizards. It’s a valuable tool for network admins to deploy routers and give them more confidence and to do it in an easier way.
You have one click router lockdown, you’ve also got a innovative voice and security auditing capability. It also monitors router status and troubleshoots WAN and VPN connectivity issues. It also includes options to configure the Cisco Services Ready Engine – the SRE modules, facilitates the integration of hardware-based functionality, and centralizing their configuration in the same place for the host and routers configured. It’s a free tool, and you can download it from cisco.com/go/ciscocp.

One of the great things about this tool, especially when you’re just getting into routing and security, is that you can take advantage of best practice configurations from Cisco TAC. By using this tool, you can lower your TCO on Cisco routers. You can reduce human errors, you can make the voice deployments simpler, you can also make sure that you have the proper linkage between users, dial plans, and voicemail settings.
You’ve got smart wizards and advanced configuration support for LAN and WAN interfaces, NAT, stateful application and firewall policy, IPS, IPsec, and SSL VPN as well as quality-of-service and NAC policy features. With this tool, you can easily organize and manage multiple routers at a single site. These Cisco Configuration and Professional Express is a lightweight version of Cisco Configuration Professional, and it usually comes on router flash and can be used to configure some of the LAN and WAN router interfaces and minimal IOS security features.
Initial configuration
Now if your router shifts with the Cisco Configuration Professional, there will be a default configuration that lets you connect your PC to an Ethernet port on the device and start configuring right away. This is done using Cisco Configuration Professional Express, this is a factory default file that’s used. It’s installed in flash memory on routers that are shipped with Cisco Configuration Pro. You can quickly configure a LAN and WAN connections, a firewall, NAT, even security settings before you put the device into production. Once you’re finished, you’ll be able to use Cisco Configuration Professional to then connect to the device over the network and make your advanced configurations.
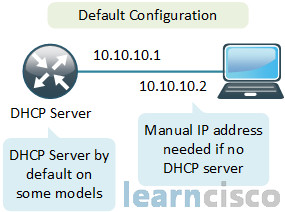
So for example, on the diagram here, we have a device default configuration file that configures an IP address for a single Ethernet interface. And that may configure the device as the DHCP server, depends on your device.

If you’re using the Cisco 815 or 1811 or 1812, it’ll have DHCP server automatically. To be sure of the defaults, make sure you check with the Cisco Configuration Professional ISR documentation.
Then after that, you connect the PC to the appropriate port according to the documentation. And then you’ll configure the PC IP address by either using the DHCP server, or if it’s not configured as a DHCP server, configure the static IP address 10.10.10.2 on your PC with a mask of 255.255.255.248. Then open up a browser window, put in the IP address of 10.10.10.1 to connect to the device and start the Cisco Configuration Professional Express. Then complete your wizard to configure the device.
If you want to use Cisco Configuration Professional to configure a device that’s already deployed, which actually is the situation for the routers in my rack, you can also accomplish these commands by going to Application > Setup New Device in the Cisco Configuration Professional. Just connect the PC to the console port. So for secure access, you’ll need to configure SSH and HTTPS, here are the commands for that:
Router(config)#ip http secure-server
Router(config)#ip http authentication local
Router(config)#line vty 0 15
Router(config-line)#login local
Router(config-line)#transport input ssh
Router(config-line)#transport output ssh
For non-secure access, you can configure Telnet and HTTP, here are the commands for that in global configuration mode and line configuration mode:
Router(config)#ip http server
Router(config)#ip http authentication local
Router(config)#line vty 0 15
Router(config-line)#login local
Router(config-line)#transport input telnet
Router(config-line)#transport output telnet
And then the user with username cisco, password cisco:
Router (config)#username cisco privilege 15 secret 0 cisco
Our Recommended Premium CCNA Training Resources
These are the best CCNA training resources online:
Click Here to get the Cisco CCNA Gold Bootcamp, the most comprehensive and highest rated CCNA course online with a 4.8 star rating from over 30,000 public reviews. I recommend this as your primary study source to learn all the topics on the exam.

Want to take your practice tests to the next level? AlphaPreps purpose-built Cisco test engine has the largest question bank, adaptive questions, and advanced reporting which tells you exactly when you are ready to pass the real exam. Click here for your free trial.
