You have several building blocks in your CCP that allow for smoother operation. You’re going to have role-based access control – RBAC. You can also have bulk configuration and monitoring options for multiple devices. You have the ability to create communities. These are groups of devices that have common components, and you can use these communities to group them up based on geographic location, their functionality, things like that.
There are also templates that parameterize the configuration files that are generated once with a common configuration. Then you can apply these several times and then use configuration variables to change specific values for each device. The template will fill in the majority of your settings. And then user profiles are GUI views that let RBAC – role-based access control – do its thing in the CCP, in the menus, in the Options areas.
Communities
A community consists of up to ten community members. You can generate a community and then add devices to it based on common parameters. For instance, you could have them based on the location. For example, the Dallas community, add devices to it; maybe you have a Boston community, add devices to it. Before you begin using CCP, you should first create a community and then add devices to that community. When you start the CCP for the first time, it’ll automatically generate a single community for you, to which you can add devices. Devices will then be discovered on the network and their configuration is uploaded to the Professional. When you add a device to a community, you designate its IP address or hostname, credential information such as username and password, and other optional parameters. The CCP will then use this data to discover the device. After discovery, you can configure and monitor it, again up to ten devices in each community. You can generate and manage communities from the Manage Community dialog box.
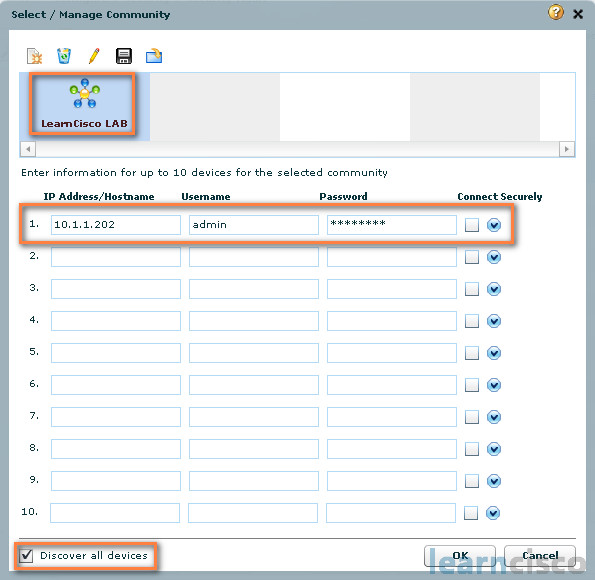
Here we can see, we’ve navigated to the Application > Manage Community area or you can get here by clicking on the Manage Communities button. In this dialog box, you create communities. It automatically displays when you start CCP, and a community – it’s called New Community – is created by default.

Next, in the Manage Community dialog box, input the IP address or hostname and the username and password necessary to get access to the device you want to configure. If you enter the default username cisco and default password cisco, the Change Default Credentials dialog box will open. So for security reasons, you have to change the default credentials to new credentials. If you want CCP to connect securely to the device, check Connect Securely. To see the port information, click the down arrow next to the Connect Securely checkbox. If you want to change the default port information, click it and then input a new port value. If you want CCP to discover all the devices in the community, then check Discover all devices. Also you can choose to discover the devices later from the Community View page. When you’re done, click OK and the Community View page opens. It’ll show you all the information about the devices in the community.
Templates
Templates allow you to create a general configuration file, then you can parameterize individual components. You can convert specific components of the configuration files into variables. Once the template is created, it can be applied to multiple devices in different communities. It includes options to offer values to the variables in the template making them specific to each device. The template remains untouched. When applying the template, you can override your existing configuration or you can merge the resulting configuration into your existing configuration.
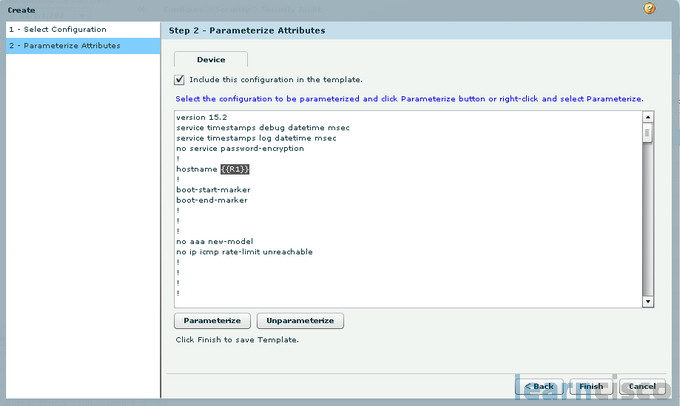
Here we can see how our wizard will guide us through creating a template. You go to Application > Template > Create, choose the device that you want to obtain a template or choose a configuration file from a local PC. Then click Include this configuration in the template. Then find and choose the attribute to be converted to variables. Then click Parameterize. You can click Unparameterize to undo if the attribute does not become a variable.

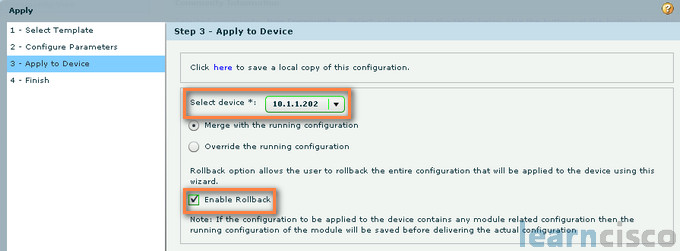
Click Finish and choose the template file and location. After the template is created, it can be applied to multiple devices by going to Application > Template > Apply. Click to browse and navigate, select the template file, and then click Find parameterized Attribute, define and choose specific text, and then change the value of the text to the values specified for the device. Click to select the router to apply the template, and click the radio buttons to choose whether to merge or override the running configuration.

Click Enable Rollback if rollback is desired. Then click to reload the router to apply the overridden configurations.
User profiles
Another tool at your disposal are User Profiles. These can define configuration views in the CCP. You can use profiles to define the view and configure the menus and screens that are visible to the users who use that profile. This will effectively generate a different Cisco CCP option tree, where screens are available to profile users in either read-only mode or full permission mode.

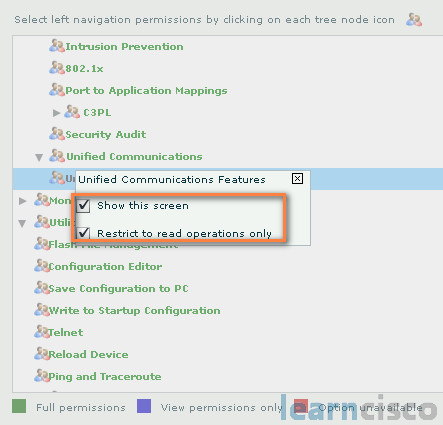
You have a wizard-based process that will guide you through the configuration of our profile and management. Navigate to Application > Create User Profile, and then click to choose the device or devices that’ll be part of the user profile. The resulting folders represent the CCP option tree, expand the folders to find the menus in the screens. Select screens to set your permissions. You’ll click the checkboxes to define permissions. You can do Show this screen, you can say Restrict to read operations only, or you can choose Disabled. Click Save to save the user profile as a file. The result will be that users will see options grayed out when they’re trying to access screens for where you disabled access, and there’ll be buttons and checkboxes grayed out when they try to use options on screens that have been configured as read-only.
Our Recommended Premium CCNA Training Resources
These are the best CCNA training resources online:
Click Here to get the Cisco CCNA Gold Bootcamp, the most comprehensive and highest rated CCNA course online with a 4.8 star rating from over 30,000 public reviews. I recommend this as your primary study source to learn all the topics on the exam.

Want to take your practice tests to the next level? AlphaPreps purpose-built Cisco test engine has the largest question bank, adaptive questions, and advanced reporting which tells you exactly when you are ready to pass the real exam. Click here for your free trial.
