This lesson explores the packet routing process from the perspective of a router. This includes a mapping between layer 2 and layer 3 addresses , as well as the ability of the router to calculate the best path toward the destination. In verifying the configuration resulting in connectivity, we will review several commands like show ip arp, ping, and trace.
Layer 2 Addressing. MAC Addresses
In exploring the packet delivery process, when having the router in the middle, we’re going to use layer 2 and layer 3 addresses. Our example’s going to be based on those MAC addresses for both the endpoints and the router. Remember at some point we’re going to resolve the MAC addresses of the router to send packets from one machine in one segment to another machine in another segment.

Layer 3 Addressing. IP Addresses
This is a layer 3 view with IP addresses for both the hosts and the router itself. Remember, your design will probably come from the fact that you want to split the two segments for performance or security reasons or some other reasons and insert a router in the middle so that you can do the forwarding of packets to the right destinations. We are going to assume only the routing function in these diagrams; however, the router could be performing security functions, packet filtering functions, firewalling, and implementing quality of service mechanisms. All of these could change the way the router forwards packets, but here we are only considering routing.

IP Routing. Packet Delivery Process
The first step is for applications to resolve DNS names if they use DNS names, translate them into an IP address and select the transport protocol to use. In this example, we are using UDP. As the information trickles down the layered model and it gets to the network layer, then the next question becomes, where is the destination, is it local or is it remote?
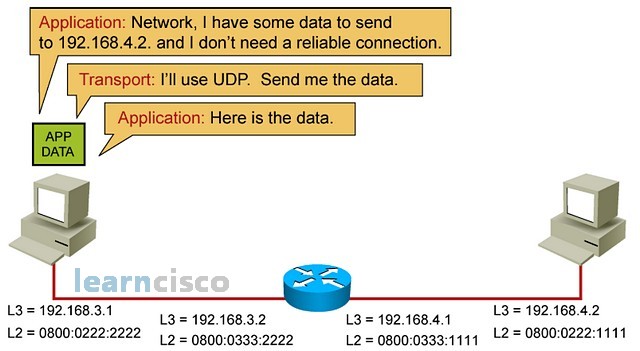
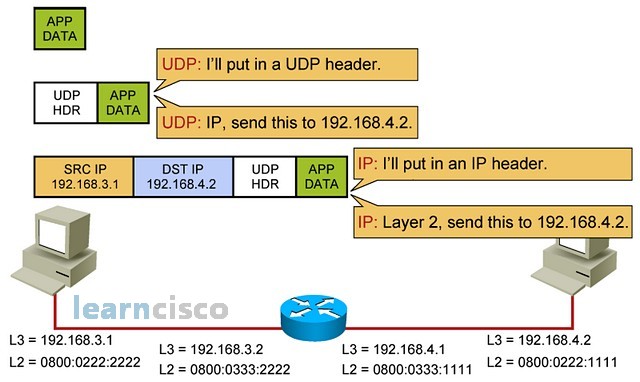
Each layer will add its own overhead in the form of headers until it reaches again layer 3, which will put it in IP header and then request the layer 2 to actually send a packet.
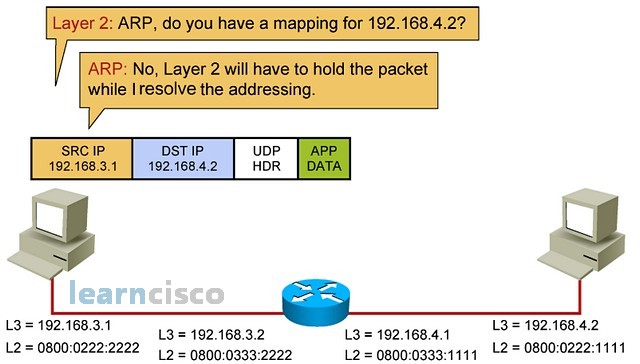
Layer 2 replies saying “I do not have information on that IP, I do not have the MAC address and so I am going to try to resolve via an ARP request.” The packet will be parked and remain in buffers until the ARP request is completed.
At this point of the process, right between layer 3 and 2, the device will say, “Well, according to this IP address and this mask, we have /24 here. The destination is in a different network. I am in network 192.168.3 and the destination is on network 192.168.4.”
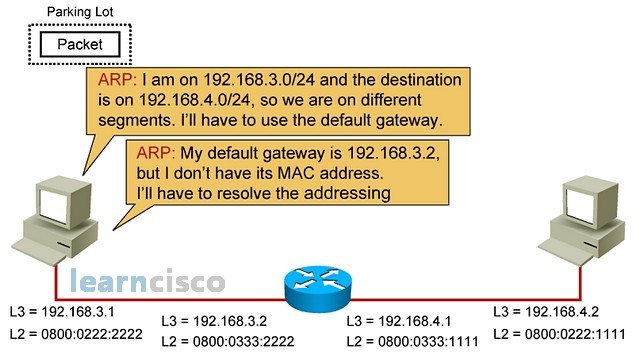
This is again because of the subnet mask, which is saying that the network identifier is located in the first 3 bytes of the IP address. So the ARP process says, “Well, I do not need to resolve them for the MAC address of the intended destination. I am not a router and I do not know how to send this, but my default gateway will know, so I am going to try to resolve for the MAC address of the default gateway, which is configured in the IP protocol configuration of the device.”
This is probably one of the first and most common sources of errors and mistakes and in troubleshooting this, we should make sure that the right default gateway IP address is configured. If I do not know where to send it or which router should process this, then the packet will not get there.
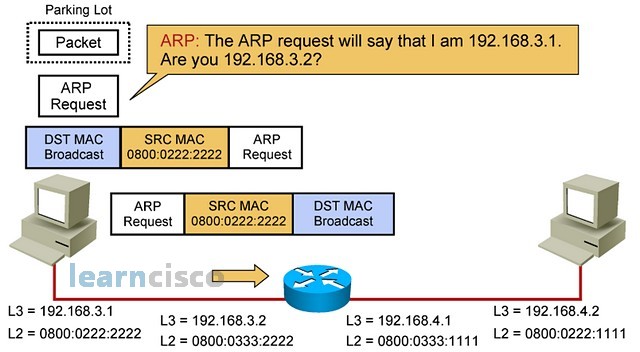
Here is the ARP request. It is a destination broadcast at layer 2 and the request itself contains the IP address to resolve, which in this case is 192 168 32, the IP address of the router. It is probably interesting to mention the existence of a functionality called proxy ARP, in which routers may be configured to reply to any ARP request, even though the request may not be directed to the IP address of that router. This is to treat them as gateways of last resort and be able to reply to calls for a default gateway that may be coming from misconfigured machines. This will have its own set of security implications and issues and so it is probably disregarded by certain security policies.
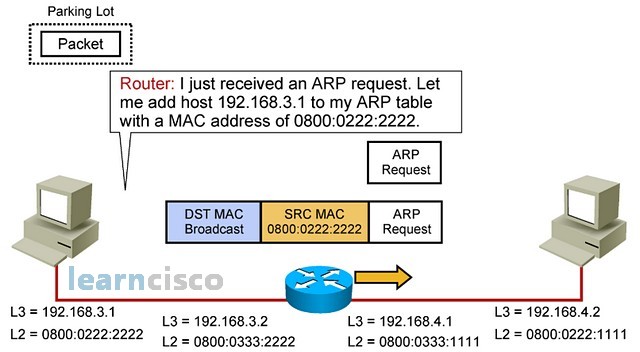
In any case, the router will receive the request and start the packet forwarding process. It will first save the MAC address and IP address of the sending machine in its own ARP table. The router is an IP device just like any other and so it will comply with all the rules of IP.
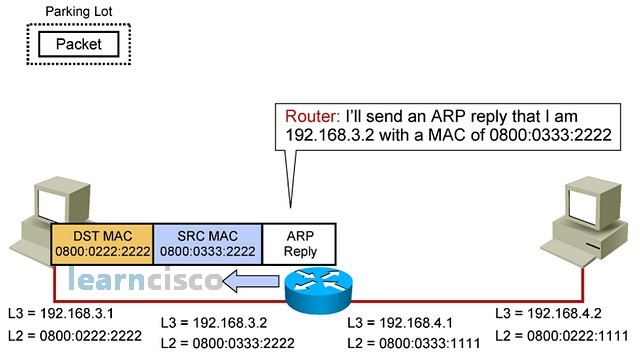
At this point, the router will send an ARP reply saying, “Hey, this is me and here is my MAC address; start forwarding packets to me.”
Now the sending host has a mapping in its ARP table that links the gateway IP address to the gateway MAC address. It is ready to send packets to that gateway for them to be forwarded toward the destination.
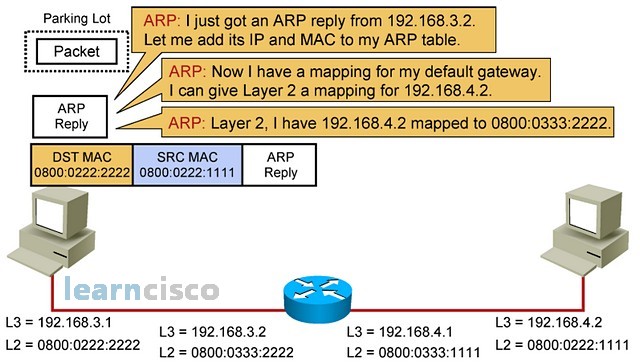
Remember, those entries will eventually time out and so the ARP process may be repeated throughout the conversation depending on idle times and absolute times.
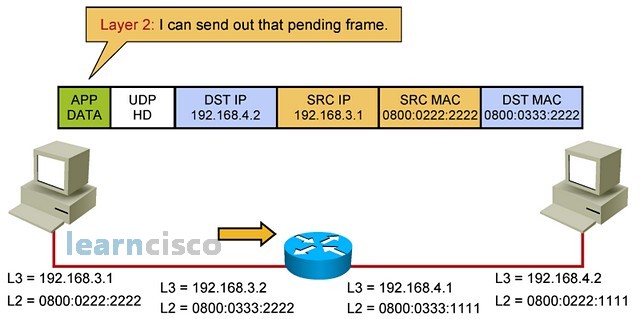
The packet that was on hold is released and sent using the intended destination’s IP address, the source IP address of the sender, the source MAC of the sender, and the destination MAC is the router’s MAC address.
Since we are talking about routing function only in the router, then we understand how this device will get up to a certain layer with only the routing function. The router works at layer 3 only, and so it will see the frame coming in. It will digest it and process it, because it is destined to itself in terms of MAC address at layer 2. It will decapsulate and send to layer 3 and it is at layer 3, where the routing and forwarding function takes place. That is why even though the destination IP address is not that of the router, the router will say, “Well I am a router, so I want to forward this according to my routing table.”
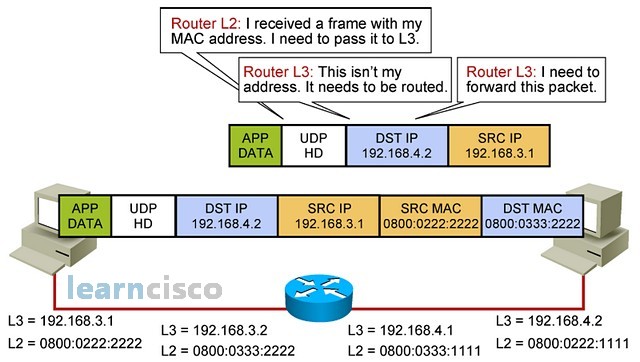
In browsing the routing table, the router will realize that the destination IP is an entry in that table. Look at 192.168.4.0 with the appropriate mask is a directly connected segment; it is actually located on Fast Ethernet 0/1. The decision is then to send directly to the layer 2 process and have layer 2 resolve the MAC address of the destination. If this was not a directly connected segment, then the entry in the routing table would point to the next-hop in the form of an IP address of another router in the path. At that point, the router would request forwarding to that intermediate device and so the ARP resolution would go on against that device to find its own MAC address. Now the case here, this is a simple scenario with two connected networks.
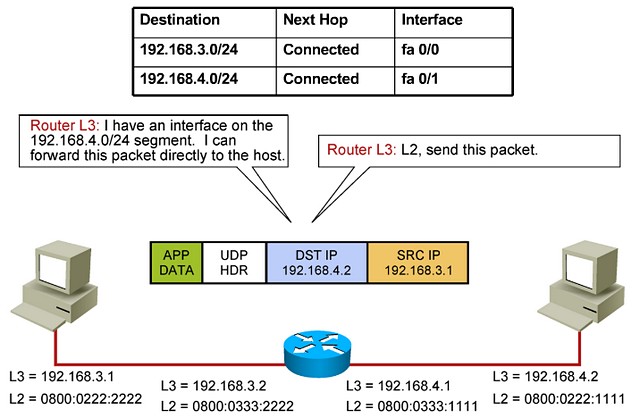
Because of that, the network layer of the router will assemble the IP header, including the IP address of the destination machine in the destination IPs field. Notice how the source address is still the original sending machine. The router is a broker that will simply forward a packet and aid and help in the communications process. At layer 2, it is an intermediate step, and that is why the MAC address is changed. But at layer 3, we are still talking about a packet being sent from this source to that destination.
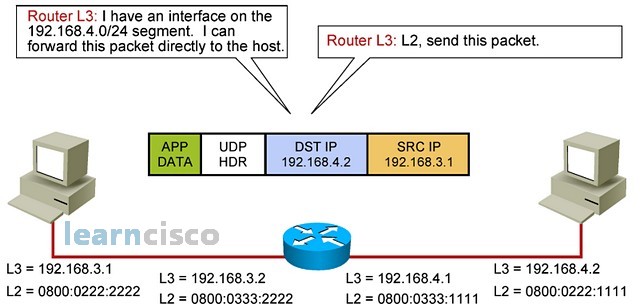
Layer 2 will say, “Hey, that is very good, but I still do not have the MAC address of the destination machine, so as a process of the router, I am going to try to resolve that address according to the IP address in the ARP request.” Remember, this is a broadcast at layer 2, and so all machines in that segment will see it, process it, and determine whether they need to reply or not.
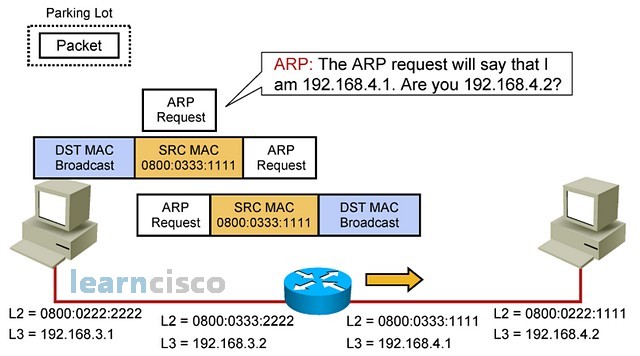
So the destination machine will receive and process the ARP request.
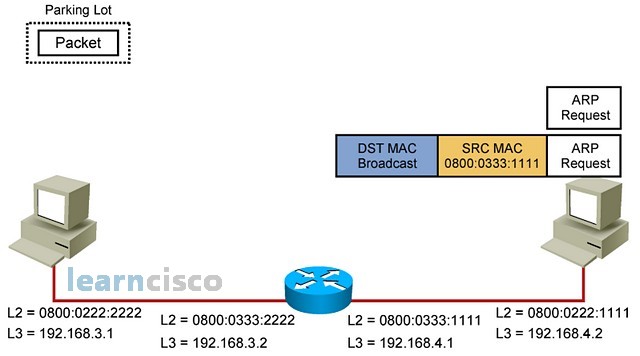
Quickly notice that the IP address is a match and reply with its own MAC address.
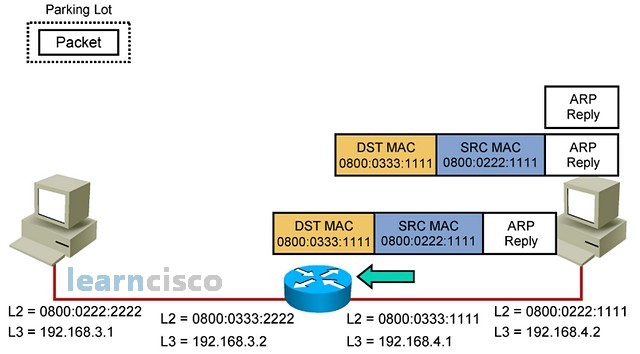
Before the ARP reply is sent, the destination machine will also save the mapping of the router’s IP to its MAC address in the ARP table. So it is interesting to see how machines will populate the ARP table, not only when they see an ARP reply, but also when they se an ARP request. This process is not very efficient, because it uses broadcasts, but it is pretty effective; all machines will quickly know who is around in terms of layer 3 to layer 2 mappings.
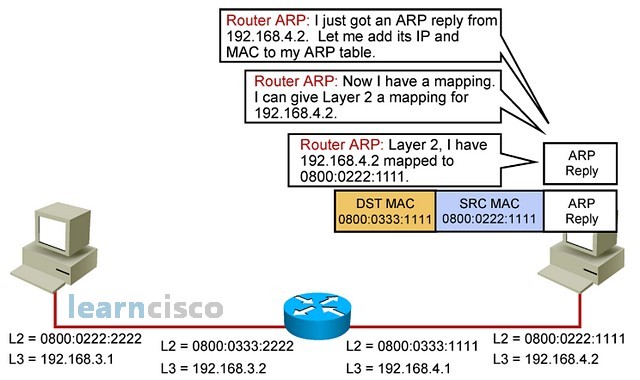
The router will see the ARP reply, know the MAC address of the destination machine, and be ready to assemble the full packet with source and destination IPs related to the original source and the intended destination and the source MAC being the routers MAC, and destination MAC being that machine’s MAC.
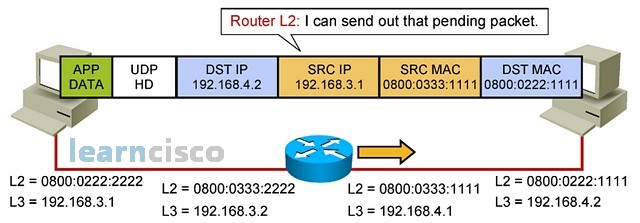
So IP communications in remote networks is nothing more than the incremental work of a series of brokers called routers that will sit in the middle of the path and forward the traffic according to certain intelligence. However, the overall process in terms of ARP, mappings, etc., is exactly the same.
If you want to verify the ARP table in routers, you can use the show IP ARP command. Here you see the IP addresses, the mapping MAC addresses, and the interfaces where those MAC addresses are located.
Router#sh ip arp

Protocol  Address          Age (min)  Hardware Addr   Type   Interface

Internet  10.10.98.1              -   7081.0597.ca61  ARPA   GigabitEthernet0/1.1098

Internet  10.10.98.2             18   649e.f32c.7571  ARPA   GigabitEthernet0/1.1098

Internet  10.10.98.3             76   001d.709f.d1e0  ARPA   GigabitEthernet0/1.1098

Internet  10.100.0.1            237   0000.0c07.ac82  ARPA   GigabitEthernet0/2.2939

Internet  10.100.0.2             14   000d.6630.a01a  ARPA   GigabitEthernet0/2.2939

Internet  10.100.0.3             30   000d.6630.9c1a  ARPA   GigabitEthernet0/2.2939

Internet  10.100.0.4              -   7081.0597.ca62  ARPA   GigabitEthernet0/2.2939

Internet  10.100.0.5              -   0000.0c07.ac64  ARPA   GigabitEthernet0/2.2939

Internet  10.201.1.1            138   a0f3.e433.6485  ARPA   GigabitEthernet0/2.3057

Internet  10.201.1.2             92   001c.5821.968d  ARPA   GigabitEthernet0/2.3057

Internet  10.201.1.3            243   001a.6dbe.406c  ARPA   GigabitEthernet0/2.3057

Internet  10.201.1.4            221   001c.f6d5.f64d  ARPA   GigabitEthernet0/2.3057

Internet  10.201.1.5            148   649e.f32c.7572  ARPA   GigabitEthernet0/2.3057
You may see static increase under the type column and that means that with no regards to the ARP process that mapping will always take place toward that IP address. This is useful in some situations but very dangerous in some others.
In order the troubleshoot the process, a few layer 3 tools are available. The ping command initiates the ping request. Ping is in the diagnosis tool that allows you to test connectivity and in the process of doing that, find information about the conditions of that connectivity; it is layer 3 and so you will ping a host name or an IP address. This will use ICMP echo requests, ICMP being a layer 3 protocol, and it will wait until it sees an ICMP echo reply from the destination. It has certain settings in terms of how long it will wait, and how many probes or requests it will send, and with what size of the packet.
Trace will give you a visual as to the routers in the path toward the destination. It will list all these hops along with their IP address or DNS name and along with certain additional information like roundtrip times. As you see the output of trace, it is going to be nothing more than series of lines where each line is a router that is processing the packet and forwarding it to the destination. This can be used similar to ping, as a testing tool to determine whether a host is alive and kicking, but it can also be used to try to determine performance issues, path determination issues, failed links or failed hops, and roundtrip delay from source to destination. In Cisco routers, the trace function is enabled with the traceroute command.
Our Recommended Premium CCNA Training Resources
These are the best CCNA training resources online:
Click Here to get the Cisco CCNA Gold Bootcamp, the most comprehensive and highest rated CCNA course online with a 4.8 star rating from over 30,000 public reviews. I recommend this as your primary study source to learn all the topics on the exam.

Want to take your practice tests to the next level? AlphaPreps purpose-built Cisco test engine has the largest question bank, adaptive questions, and advanced reporting which tells you exactly when you are ready to pass the real exam. Click here for your free trial.
